Setting up an email account
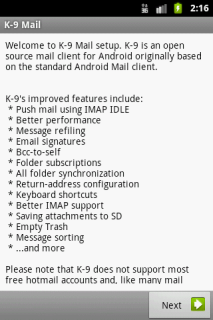
When starting K-9 Mail for the first time you are greeted with a welcome screen. Click "Next" to start the account creation wizard.
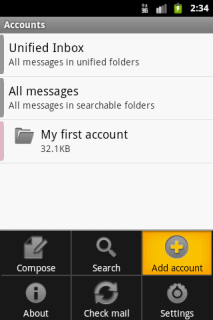
Alternatively, if you've already set up K-9 Mail, and you want to add an additional mailbox account, go to the Home Screen, tap the menu button and select "Add account"
First you are asked for your email address and password.
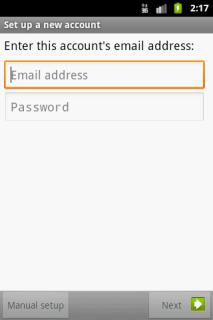
The buttons "Manual setup" and "Next" become only activated after a correctly formatted email address and a password have been typed in.
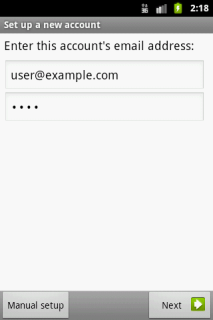
If you choose "Next" and the domain part of your email address is known to K-9 Mail, the connection settings for the incoming and outgoing server are automatically set up for you. This is the case for some large email providers, e.g. Gmail, Yahoo!, and AOL
Configuring the incoming server
If the domain is unknown to K-9 Mail or the "Manual setup" button is used, you have to manually enter your server settings. But first you are asked for the account type. Available options are POP3, IMAP, and WebDAV (supported by Exchange versions up to 2007).
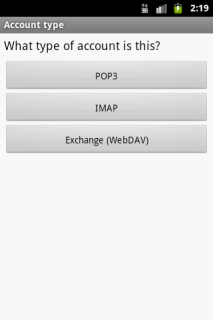
All of these are names of protocols to access your mailbox. If your email provider supports it, we strongly recommend you use POP3. It is superior to the others and well supported by K-9 Mail.
The following chapters describe the steps necessary to set up an account using the given protocol.
IMAP
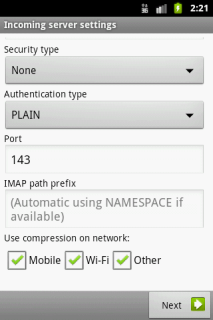
The following two images show all the IMAP related settings. Later we describe them in detail. Note that on a smartphone, your popped-up soft keyboard may be covering some of these entry fields; don't forget to scroll.
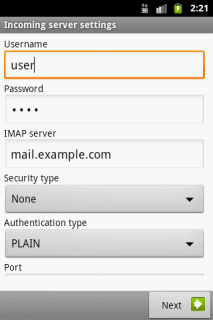
Username: This is the username that's needed to authenticate to the IMAP server. The field is initialized with the user part of your email address. Some servers are ok with this; some, generally those which support multiple domains, require that you fill in your entire email address here.
Password: Here you enter the password to access your emails. The password you entered at the first step of the account creation process is pre-entered here. So you shouldn't need to change it. This password is the one which an administrator set for you or gave to you, which you use to retrieve mail from the mailbox.
IMAP server: This is the hostname or IP address of your IMAP server. Note that this address must resolve to your mail server no matter what network you're connected to -- if you provide a name or IP that's only resolvable inside your private network, that's the only place you'll be able to pick up email. Some firewalls can also cause trouble here. If K-9 can't otherwise guess, it will fill in mail.$DOMAINNAME here.
Security type: This specifies the cryptographic protocol that should be used when connecting to your IMAP server. Available options are:
- None: This doesn't use any transport security at all.
- SSL (if available): SSL/TLS is used but the certificate isn't checked.
- SSL (always): SSL/TLS is used and the certificate presented must be valid.
- TLS (if available): The STARTTLS method is used if available; the certificate isn't checked. If STARTTLS is not available, no encryption is used at all and email will be moved in the clear.
- TLS (always): The STARTTLS method is used and the certificate is checked for validity.
Note: Avoid using the options "None", "SSL (if available)", and "TLS (if available)" if you can. Check the chapter Security for more information on this.
Authentication type: This specifies which authentication method to use after you have a valid, hopefully encrypted, connection. Available options are:
- PLAIN: This is the default method. You shouldn't need to change this.
- CRAM_MD5: Use this if your server doesn't support transport security but supports the CRAM_MD5 authentication method.
Port: This is the port number the IMAP server is listening on. Most of the time you don't want to change this. It will generally be port 143 for non-encrypted connections, 993 for encrypted ones (IMAPS) or occasionally you might need to use 585 (IMAP4-SSL). If your port number is something else, the mail server administrator should have told you.
IMAP path prefix: The content of this field is prepended to IMAP folder names before use. The main usage is to manually select which IMAP namespace to use. As the entry field notes, this can be automatically guessed, so usually, you don't need to change this. (IMAP exposes your mailbox, any internal folders, and usually such things as pre-saved searches and your contacts list all as parts of a folder/directory tree, as you see them from a remote client like K-9.)
Use compression on network: If your server supports compression (DEFLATE) it is used on the selected networks to minimize the amount of data transferred. Selecting this, even if your server doesn't support compression, doesn't cause problems. So there should be no need to change these.
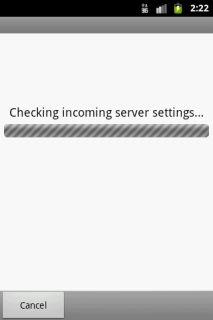
After clicking "Next" K-9 Mail tries to connect to the server to verify the settings. This means you need to have a working network connection to continue the setup.
 Skip down now to Configuring the outgoing server.
POP3
POP3 mailbox setup is almost identical to IMAP, except that there is no Path Prefix or Compression available, and the port numbers are 110 for non-secure or 995 for secure connections. There's one additional question:
Show only subscribed folders: This shows only subscribed folders. [ It's not clear to me where the subscription takes place, there; POP3 generally only provides access to your inbox from the server, as that's all it has; all foldering and message storage is local in POP, whereas in IMAP the messages all live on the server. --Baylink ]
WebDAV (Exchange)
This is also similar to setting up an IMAP mailbox, except that the port will be 80 (non-secure) or 443 (secure), and three additional configuration options are prompted for: Mailbox Alias, OWA Path, and Authentication Path. Your server admin will need to provide these, if you need to use them.
Configuring the outgoing server
To be able to send mail K-9 Mail needs to know the settings to your provider's SMTP server. In this step of the account creation process you have to provide those details. Below is an explanation of the different settings. In certain circumstances, you may need to use a different outgoing server than you'd expect; we'll discuss those later.
Because of the nature of email service, you often (if not always, these days) send outgoing mail to one server, but pick up incoming mail from a separate one; this is why many of the items below say "this is often, but not always, the same as the setting for outgoing mail". Additionally, you can sometimes use one outgoing mail server (often a private or corporate one) for all outgoing mail, bypassing the standard outbound mail servers which you'd otherwise use for a given mailbox. We won't get too deeply into these cases; if you can do this, you probably already know how.
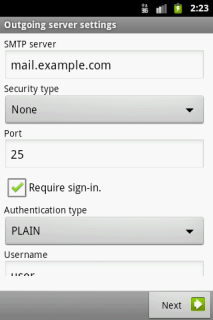
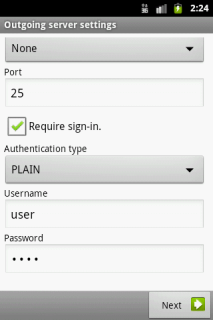
SMTP server: This is the hostname or IP address of your SMTP server. As above, this name or IP must be accessible from any network from which you may want to send mail, whether your cellular carrier's WAN or a private LAN via wifi. See below for more details if you have trouble.
Security type: This specifies the cryptographic protocol that should be used when connecting to your SMTP server. Available options are:
- None: This doesn't use any transport security at all.
- SSL (if available): SSL/TLS is used but the certificate isn't checked.
- SSL (always): SSL/TLS is used and it's checked if the certificate is valid.
- TLS (if available): The STARTTLS method is used if available; the certificate isn't checked. If STARTTLS is not available, no encryption is used at all.
- TLS (always): The STARTTLS method is used and the certificate is checked for validity.
Port: The port number your provider's SMTP is listening on. This may be 25, 465 or 587, depending on the configuration and transport security settings of your server and K-9.
Require sign-in: Tells K-9 Mail whether or not it will be expected to authenticate to the server. In almost all cases this needs to remain checked.
Authentication type: This specifies which authentication method to use. Available options are:
- PLAIN: This is the default method. You shouldn't need to change this.
- CRAM_MD5: Use this if your server doesn't support transport security but supports the CRAM_MD5 authentication method.
Username: The username that's needed to authenticate to the SMTP server. This is usually equal to either the left-hand side of, or the entire, email address; your mail server operator should have told you what to use as an Outgoing username -- and it will commonly be identical to the incoming username, though not always.
Password: The password that's needed to authenticate to the SMTP server. This is often, though not always, identical to the password for the incoming server.
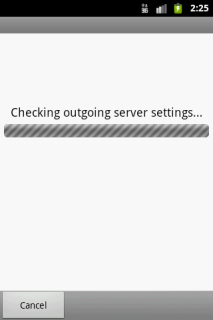
To complete the outgoing server configuration click "Next". And again, K-9 Mail tries to connect to the server to verify the settings you just entered.
Account options
After successfully setting up the incoming and outgoing servers, you can now configure some basic settings on how often K-9 Mail checks for new messages, if you want to be notified of new mail, etc. These settings are specific to each account/mailbox you configure; you can set them differently for different mailboxes.
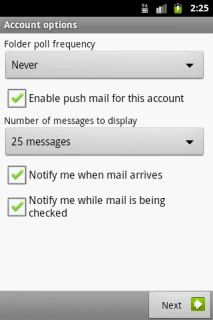
Folder poll frequency: Here you specify in what interval K-9 Mail should check the incoming server to see if there are new messages. Available options are:
- Never
- Every minute
- Every 5 minutes
- Every 10 minutes
- Every 15 minutes
- Every 30 minutes
- Every hour
- Every 2 hours
- Every 3 hours
- Every 6 hours
- Every 12 hours
- Every 24 hours
Enable push mail for this account: This option is only available for IMAP accounts. When it is enabled a long-lived connection to the IMAP server is established so K-9 Mail can be notified by the server when a new message has arrived. When this is set, you do not need to select a poll frequency, because you do not poll. This generally decreases power consumption in addition to decreasing delivery notification delay, and is a good enough thing that it can be worth selecting a mailbox on the ground that the provider supports IMAP IDLE.
Number of messages to display: This value determines how many messages are kept locally cached and displayed. Available options are:
- 25 messages
- 50 messages
- 100 messages
- 250 messages
- 500 messages
- 1000 messages
- all messages
Higher values have some performance implications. Read the description of the setting Local folder size in chapter Account settings for more information.
Notify me when mail arrives: If this is checked you are notified when a new message was downloaded in this mailbox. Notification type (LED, vibration) and ringtone can be configured later. See Notifications in chapter Account settings.
Notify me while mail is being checked: If this option is enabled K-9 Mail will inform the user when an account is being synchronized by displaying a message in the Android title bar.
Last step
To complete the account creation you have to fill out the following two fields:
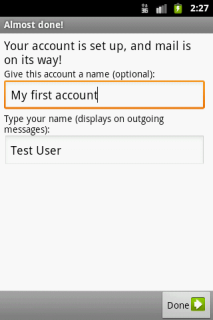
Give this account a name (optional): This is the name of the account that will be displayed in the account list. If you leave this field empty the email address associated with this account will be used.
Type your name: This will be used as your name for messages sent using this account.
Once you've done this, click Save, and the account will be completely set up. It will start to attempt to retrieve mail immediately, and this can sometimes be troublesome. If you don't want it to do this, the only thing you can presently do to avoid it is to disable your data connections (Wifi, 3G, 4G) before clicking that last button.
You can now set up additional accounts, if necessary, by choosing Menu->Add Account from the Home Screen -- the screen which displays the Unified Inbox and All Messages pseudo-folders as well as each of your mailboxes.


